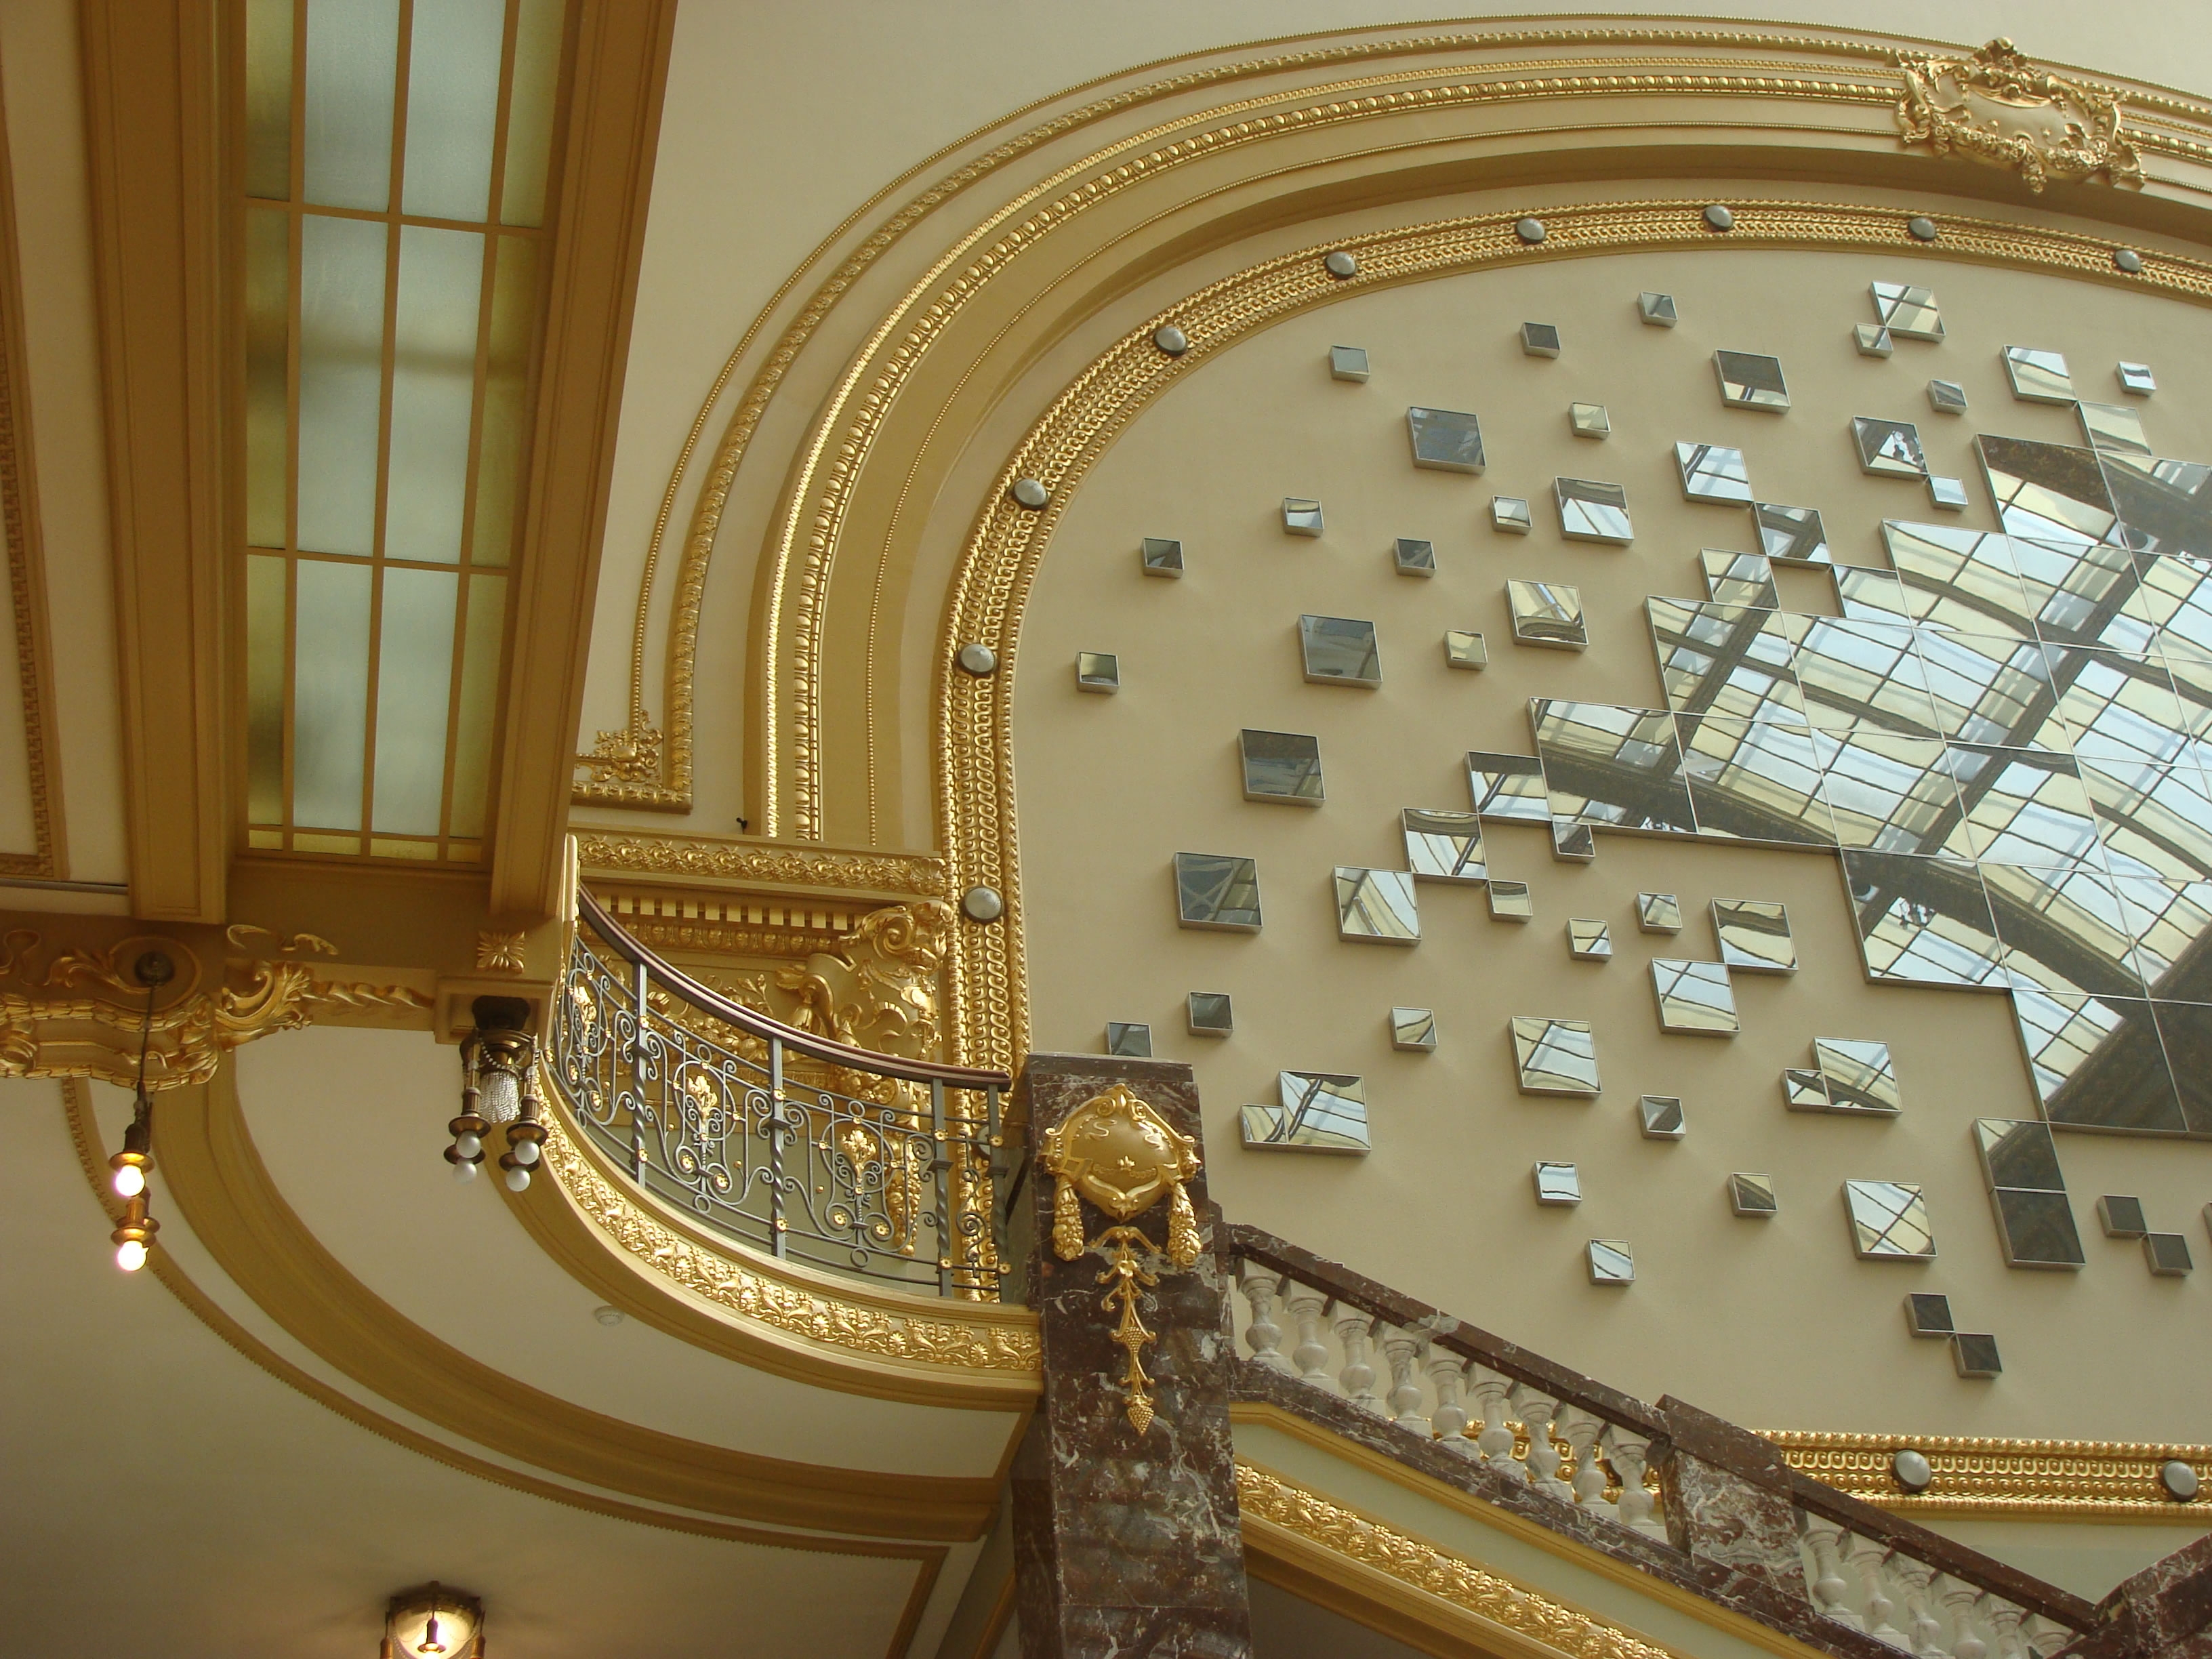
This is a tutorial which will help you to create a lovely, magic looking wood full of glowing flowers, golden insects and nice birdie covered in glossy feathers. We'll make all these creatures from a single source image- stunning picture of Gold Interior taken by Hilleke.
You can download the image from here.
In the process of creating the Magic Wood we'll be using lots of transformations, different layer styles and Actions Panel.
I used Adobe Photoshop CS 4 to create everything but all versions where Warp tool (Edit, Transform, Warp) is available will suit our purpose.
Enough with this intro, let's get down to work :)
End result:

Step 1
Open the Gold Interior image in Photoshop and with double mouse click turn the background into a layer.
To change the orientation of the whole image, select Image menu, Image Rotation and choose 90 CW (clockwise).
Create a new Group of layers named Background and call the first layer the same name- Background. Set your foreground color to #152328 and background color to #020b11. Go to Gradient Tool, select Foreground to Background Radial Gradient and draw it vertically from top to bottom of the canvas.
Just a little tip: You have noticed that there is no layer with the original source image on my screenshots. I have cleaned it not to distract you, but it is good to keep the source layer below all layers and groups in Layers palette so that you can easily select any part of it when necessary.

Step 2
In this step we’ll continue using Gradient Tool. Create a new layer within Background group, go to Gradient tool and this time choose Purple, Green, Gold Gradient from the Gradient picker (You can find this Purple, Green, Gold Gradient in Color Harmonies 2 gradients set). Keep selected the Radial gradient option and draw the chosen gradient diagonally from top right hand side to bottom left hand side of the canvas. Name this layer Purple, Green, Gold Gradient and lower its Opacity to 11%.

Step 3
Create a new layer placed above Purple, Green, Gold Gradient layer in Background group. Set foreground color to # A8D5D3 and Background Color to # 102023, go to Filter, Render, Clouds, then apply Filter, Render, Difference Clouds and press Ctrl+F to repeat the last filter. Select Eraser Tool, choose Soft Brush of big size and lowered opacity, 30% approximately, and use it to erase the bottom 1/3 of the layer. Name this Layer Clouds Overlay, set its Blend Mode to Overlay and reduce opacity to 10%.

Step 4
Duplicate the Clouds Overlay layer and go to Filter, Blur, Motion Blur, Angle 90 degrees; Distance 170px. Change the Blend Mode to Screen and Opacity to 8%. Name the layer Clouds Motion Blur and leave on top of all layers in Background group.

Step 5
Let us create the branches on which our magic bird is going to alight.
Use Polygonal Lasso tool to select a nice portion of the golden ornaments (please see the image to this step) and with Ctrl+J place the selected part on a new layer. Click with the right mouse key on it, select Blending Options, tick Bevel and Emboss and apply the following settings:
Style: Inner Bevel;
Technique: Smooth;
Depth: 100%;
Direction: Down;
Size: 69 px;
Soften: 0 px;
Angle: - 60 degrees;
Use Global Light is checked;
Altitude: 30 degrees;
Gloss Contour: Linear;
Anti-aliased is not checked;
Highlight Mode: Overlay; Color: # b5a419;
Opacity: 49%;
Shadow Mode: Overlay; Color: # 000000;
Opacity: 62 %.
Now create a new layer, place it below the last created one (the selected portion of golden ornament) and merge both layers to apply the Layer Style (Bevel and Emboss). Name the layer Branch.

Step 6
We are to do some nice transformations in Actions palette in order to create a nice branches for the bird.
Go to Window, select Actions in order to appear your Actions palette on the screen. Click on the New Action icon and you'll see on your screen New Action dialog box. Leave its name as default- Action 1 and press Record button to start recording. Duplicate the previously created Branch layer and on the duplicate apply Edit, Free Transform, hold down Shift and press twice Upper Arrow key to nudge, in Free Transform Settings change Angle of Rotation to 2.3 degrees.
Do not press Enter as we usually do to apply chosen transformation. Go immediately to Edit, Transform, Warp and slightly change the shape. Now it’s time to hit Enter key to apply both transformations. Press also Stop Playing/Recording button on your Actions Palette, then press 26 times Play Selection button on the same palette. You must have 27 Branch layers- from Branch to Branch copy 26. Merge all of them into one layer, named Branch. You can select Action 1 in your palette and drag it to the Delete icon to get rid of it and to get ready for the next action.
You must have a nice golden branch now.

Step 7
Duplicate a few times the branch layer created in the previous step (I duplicated it six times). On each of the duplicates apply Edit, Transform, Warp. Use also Edit, Free Transform to resize the duplicated branches.
The hot keys for Transformations are Ctrl+T, then right click and choose the transformation you prefer to apply from the dialog box.
Once you are satisfied with the transformations, arrange each of the branches to make a nice part of a mystic golden tree. Integrate all branches layers in one group named Branches. Look at the following screen shot. I have named each branch layer according to its place.

Step 8
In order to look the branches more bizarre, select a thin golden line ornament from the wall, duplicate it four more times and resize each of the copied layers to fit the respective branch. Merge all layers in one and name it Branch Sticks. Place it at the bottom of Branches group of layers.
Create a new layer located above Branch Sticks layer. Take Soft Brush of 20px size and foreground color # 7cfaff to paint the “stamens” of the tree blossoms. Reduce this layer’s opacity to 57% and to give the stamens more relief apply Blending Options, Bevel and Emboss:
Style: Inner Bevel;
Technique: Smooth;
Depth: 100%;
Direction: Down is checked;
Size: 23 px;
Soften: 0%;
Angle: minus 60 degrees;
Use Global Light is checked;
Altitude: 30 degrees;
Leave all other settings as given by default.
On top of all layers in Branches group you see layer named Shadow Branches. To make it simply highlight all branches layers merge them, rename the layer to Shadow Branches and change its Blend Mode to Multiply, and Opacity to 63%.

Step 9
Create a new layer placed below Soft Brush layer within the Branches layers group. Set foreground color to # aebecb, take Fuzzbal (default) brush and paint the blossoms. Name the layer Fuzzball Brush and after right click on it to choose Blending Options apply to it the following layer styles:
Outer Glow:
Blend Mode: Screen;
Opacity: 75%;
Noise: 0%;
Color: # 1b4bb0;
Technique: Softer;
Spread: 0%;
Size: 2px;
Leave all settings in Quality field as given by default.
Bevel and Emboss:
Style: Inner Bevel;
Technique: Smooth;
Depth: 11%;
Direction: Down;
Size: 8px;
Soften: 0px;
Angle: minus 60 degrees;
Use Global Light is ticked;
Altitude: 30 degrees;
Gloss Contour: Linear (default);
Anti Aliased is not ticked;
Highlight Mode: Overlay;
Highlight color: # 1653ae;
Highlight Opacity: 100%;
Shadow Mode: Multiply;
Shadow Color: black (default);
Opacity: 75%.

Step 10
Now we should start with shaping the bird. In case you prefer drawing to warping, you can use your own sketch of a bird. I chose to warp the bird’s base from selected part of the source image. If you prefer to follow my way, take your Elliptical Marquee tool, select a nice brownish part of the column and by means of Edit, Free Transform (to increase the size of selected ellipse) and Edit, Transform, Warp shape the head of the bird.

Step 11
Here we continue with the birdie’s body. Use again elliptical selection and the upper described transformations (Free Transform and Warp) to shape the body. Keep each part of the bird on a separate layer and combine all layers into a new group called Bird.

Step 12
Carry on your work within Bird group of layers. Let us add wings and legs to our bird. Take again Elliptical Marquee Tool to select oval part of the column. Go to Edit menu, choose Free Transform and Edit, Transform, Warp to shape the wing. Create the same way the leg.

Step 13
Use the same tools to make the tail. Now the bird is almost ready but it looks flat. Duplicate both previously created layers in Step 12 and place them below all bird’s layers. Transform them slightly to show that the bird has two wings and legs. I have used white background for your convenience- to see how the bird’s shape looks. Take also into consideration my Layers palette and the way I have placed all layers into Bird Sample group.

Step 14
Select a darker ornament with more relief to shape the bird’s legs. Go to Edit, Transform, Warp and turn the selected part into legs and claws. Use Burn Tool to give volume and shadows. In order not to overload my .psd file I merged all layers forming the bird leg into one layer called Right Leg. After that duplicated Right Leg layer, used Edit, Free Transform (including its rotating function) and Edit, Free Transform, Warp to change the shape of the leg, renamed the duplicated layer Left leg and placed below the original layer.
As you can see in my Layers Palette, I have put both leg layers in one group called Bird Legs.

Step 15
In the following steps we are going to add some feathers to the bird.
Firstly create a new group of layers named Bird and place it above Bird Sample group.
Within Birds group of layers create a subgroup called Head Feathers. There we’ll place all shapes that will cover the birds head as feathers.
Select a part of the balcony, press Ctrl+T and apply Free Transform and Warp to give it petal like shape. Scale it down more to make it smaller- we need this shape to create the neck feathers. Don’t forget to zoom in your image unless you want to loose your sight in the name of Photoshop. Call the shape Head Feather and place it as a first layer in Head Feathers group. Duplicate this Head Feather layer and go to Edit, Free Transform, hold down Shift and press Right Arrow key FOUR times to nudge. Set the Angle of rotation to minus 6,7 degrees.
Press Enter to apply the transformation’s settings then hold down Ctrl+Alt+Shift keys and press T on your keyboard 11 times. You should have 13 Head Feather layers in Head Feathers group.

Step 16
Merge all Head Feather layers and place the arch shape (its layer received Head Feather name automatically when merged) between the bird head and neck. Duplicate it once again and put the copied arch of feathers above the previous one. Scale it down slightly by means of Free Transform. Our purpose is to cover the whole head in feathers.

Step 17
Duplicate the head feathers arch more using Free Transform and Warp to scale them and shape so that to cover the bird’s head. When ready, merge all arches in one layer named Head Feathers Merged. In order to give volume and shadows, we’ll process three duplicates of the last layer.
Firstly duplicate Feathers Merged layer, change its Blend Mode to Soft Light and decrease opacity to 58%. Name the layer Merged Soft Light.
Duplicate the original Feathers Merged layer once more, place the duplicate above last created Merged Soft Light Layer and name it Shadow. Change its Blend Mode to Multiply and lower the Opacity to 38%. Take Eraser Tool (Soft Round Brush, Opacity- about 50%) and erase the middle part of Shadow Layer. Leave only the edges darkened.
I use this method to avoid drawing shadows with dark brushes and Burn Tool.
Duplicate Feathers Merged layer for a third time and place the duplicate on top of all layers within Head Feathers Group. Set the Blend Mode to Overlay, Opacity to 67% and name the layer Shadow_2. Choose again Eraser Tool, Soft Round Brush and Lowered Opacity to erase most parts of the layer. Leave intact only the portion, covering the upper side of the head.
Your bird’s head and layers palette should look like this:

Step 18
Select the brown ornament on the wall, below the balcony and use again the almighty Warp transformation to shape the beak. Firstly make the upper part, duplicate its layer, flip it vertically (Edit, Transform, Flip Vertical), faintly resize it only to make it asymmetric and fit both upper and bottom beak shapes to the head. Integrate both layers in a new group placed above Head Feathers folder. Rename the group Beak and call both beak layers Upper Part and Bottom Part respectively. Add shadow on a new layer named Beak Shadow and with transparent black brush (Soft Brush, Opacity 30-40%, black color) add shadow to where the beak parts meet the head.

Step 19
We continue with covering the bird body with nice golden feathers. Select the strawberry-like part of the big ornament of the balcony column. Duplicate its layer and while the duplicate is highlighted, go to Edit, Free Transform and slightly rotate and nudge the duplicated strawberry to the right. As you can see from my screen shot, the Angle of Rotation is set to minus 4.5 degrees
Hit Enter to apply the transformation, hold down the hot keys combination Ctrl+Alt+Shift and press T key 12 times. You should have a nice golden strawberries necklace. Select and merge all of its layers to make your work easier. Name the new layer Neckfeathers. Below Head Feathers group of layers create a new group called Body Feathers and place there our last Neckfeathers layer. Have a look at my screen shot with the image and layers palette below.
As you can see, I have additionally warped the strawberry “necklace” as it should fit the bird’s neck and to give it more volume, have applied on its layer Bevel and Emboss blending options with settings:
Style: Inner Bevel;
Depth: 100%;
Direction: Up;
Size: 18 px;
Soften: 0 px;
Angle: 30 degrees;
Gloss Contour: Linear (default);
Anti- Aliased is not ticked;
Highlight Mode: Soft Light;
Highlight color: #d98f50;
Opacity: 68%;
Shadow Mode: Multiply;
Color: # 000000 (black);
Opacity 26%.

Step 20
In this step our task is to cover the neck with feathers. Place the previously prepared Neck Feathers at the lower part of the neck. Duplicate that Neck Feathers layer, use Move Tool to replace the feathers above the original ones then go to Edit, Free Transform and Edit, Transform, Warp to fit the upper feathers line to the neck. To complete the neck feathers style, duplicate Neck Feathers and Neck Feathers copy layer. Merge them both and place this new merged layer at the bottom of the group. Adjust these feathers between the Head and the Neck Feathers, transform and warp them to wind up the neck.

Step 21
Cover the whole body of the bird with the same strawberry ornament to simulate golden feathers, just like you did in previous step. As you can see from the screen shot, I have merged those layers in one Body Feathers layer.
As you can see from this step screenshot, there are two layers placed below head feathers group- Left Leg Feathers and Shadow Left Leg Feathers. Both feathers don’t belong to any group. Actually Left Leg Feathers group is the duplicated, merged and renamed Head Feathers. Simply Warp it to make a nice bird’s “pants”. To give it shadows and highlights, load a selection- Ctrl+ left click on Left Leg Feathers layer’s thumbnail, create a new layer named Shadow Left Leg Feathers, grab Soft Black Brush of 30% Opacity and darken the edges.
As we should not leave the feathered creature with only one pants-leg, duplicate the two previous layers, merge them and move the layer into Bird Sample group above Right Wing Layer. Use Move Tool and Edit, Transform, Warp to fix these new “feathers” to the Bird Sample. Rename the layer Right Leg Feathers.

Step 22
In the next screen shot you will see what part of the balcony ornament I have chosen to create the wing. First of all select that portion of the golden ornament and name its layer Wing Feather. Immediately create a new group named Wing and place there the Wing Feather layer. Let’s transform it in order to make the first line of “feathers”. Copy the Wing Feather layer and while it is still highlighted, go to Edit, Free Transform to scale, nudge to the right with Right Arrow and rotate it (Angle of Rotation 3.5 degrees).
Press Enter to confirm the transformation, hold down Ctrl+Alt+Shift and press T key seven times. Now you should have eight copies of your Wing Feather layer- from Wing Feather copy to Wing Feather copy 8.

Step 23
Merge all Wing Feathers layers in the Wing group. Name the layer Wing Feathers 1. While the layer Wing Feathers 1 is still selected, duplicate it five more times. Scale down and warp each of the duplicates to shape a part of the bird’s wing “feathers”. Do your best to cling to the sample.

Step 24
In this step all you have to do is to carry on your work in Wing group. Continue to duplicate the Wing Feathers layers, scale down and warp till you cover the whole wing in golden feathers. In the screenshot to this step are given all thirteen Wing Feathers layers in Wing group and how the whole wing looks when covered with feathers.

Step 25
Let us continue to beautify the wing. For the purpose I have selected the bottom part of the balcony ornament. As its shape is curved, it does not need transformations to be applied. Only darken its wider edge with Burn Tool. Duplicate it and place the duplicate slightly below the original layer. Then merge these layers and name the new one Bottom Feathers. Place it below Wing Feathers 1 layer within the Wing group. For your convenience I have switched off all previous wing layers to see in the screenshot how these new bigger feathers are arranged.
From the same selected part of the balcony ornaments, create the other feathers. The layers are named (after all duplicated layers have been merged) Bottom Wing Feathers 1 and Bottom Wing Feathers 2. You can darken them a bit by means of Image, Adjustments, Brightness and Contrast, set Contrast to minus 40.

Step 26
Another easy step is coming here. Simply duplicate the Wing group. Right click on the duplicate and choose Merge Group. Rename the new created layer deriving from the merged group to Side Wing and place it below Body Feathers group. I have marked the layer in yellow in the following screen shot. Apply Image, Adjustments, Brightness and Contrast and reduce the brightness.

Step 27
It’s time to start shaping the tail. Select the thick golden ornament at the bottom part of the balcony, apply Edit, Transform, Warp to squeeze one of the sides. Name the layer Tail Feather 1, change its Blend Mode to Hard Light and place it above Body Feathers group. Duplicate the layer twice and call the duplicates Tail Feather 2 and Tail Feather 3 respectively. Highlight these three tail feathers layers and bring them together into one group named Tail Feathers.

Step 28
As the tail created in the previous step looks moulting, duplicate one of the Tail Feathers layers, scale and arrange it to delight your eye and call the new layer Tail Feather 4.
To beautify the tail, go to Branches group and select one of the Branch sticks. Duplicate if a few times, apply transformations to shape the thinner feathers. To reduce the number of layers and avoid overloading your .psd file, merge all these new feathers into a group called Thin Feathers placed below all layers within Bird Tail Group.
Create a new layer above Thin Feathers and name it Tail Feathers Lights (I have highlighted that layer in the screenshot). Take a small Soft Brush of 4px size, color # 80c9d8 and paint small spots at the edge of each thin layer. To make the blue spots shiny, go to Layer, Layer Style, Outer Glow:
Blend Mode: Screen;
Opacity: 75%;
Noise: 0%;
Color: # 3ff0de;
Technique: Softer;
Spread: 1%;
Size: 26px;
Contour: Linear;
Anti-aliased is unchecked;
Range: 62%;
Jitter: 0%.

Step 29
The tail of our magic bird still looks half-finished. Create a new group named Back Tail Feathers and place it below Side Wing layer. Copy some of the tail feathers from Bird Tail group, arrange them to shape the other part of the tail and merge each four layers. I have called those two new layers Tail 1 and Tail 2. Change their Blend Mode to Linear light and reduce Opacity to 70%.
Optional: To add another color shade to the tail, go back to Bird Tail group, duplicate Thin Feathers layer and rename the new one as Thin Feathers colored. Press Ctrl+U, tick Colorize option and play with hue settings.

Step 30
As the bird is still blind, it’s high time to give it a nice goggle eye. Select the oval pearl like shape from the golden wall line and place it on the bird’s head. Name this layer Eye_Base. Create a new group of layers called Eye (create it as a subgroup within the main Bird group of layers) and place there Eye_Base layer. To add volume to the eye, go to Layer, Layer Style, Bevel and Emboss and change the settings:
Style: Pillow Emboss;
Technique: Smooth;
Depth: 62%;
Direction: Down;
Size: 32px;
Soften: 6px;
Angle: minus 60 degrees;
Check Use Global Light;
Altitude: 30 degrees;
Gloss Contour: Ring;
Anti-aliased is unchecked;
Highlight Mode: Overlay
Highlight Color: # 354c05;
Highlight Opacity: 50%;
Shadow Mode: Soft Light;
Shadow Color: # 273015;
Opacity: 61%

Step 31
We continue with shaping the eye. Now select one of the lamps resembling a huge pearl and is located under the balcony right edge. Name the layer Eye Apple and place it above Eye_Base layer. Add Bevel and emboss to give it shade and volume so go to Layer, Layer Style, Bevel and Emboss:
Style: Inner Bevel;
Technique: Smooth;
Depth: 100%;
Direction: Down;
Size: 8px;
Soften: 7px;
Angle: minus 60 degrees;
Use Global Light: checked;
Altitude: 30 degrees;
Gloss Contour: Cove-Deep;
Highlight Mode: Color Dodge;
Highlight color: White;
Opacity: 40%;
Shadow Mode: Multiply;
Shadow Color: # 24a51e;
Opacity: 39%.

Step 32
Create a new layer at the bottom of Eye group and call it Eye Darker Part. Paint a dark dot (use Soft Black brush, Opacity 30%). Use also Blur Tool to additionally soften the edges.
On top of all layers in Eye group create a new layer named Pupil. Firstly use Black brush (100% opacity) to make the black dot for the pupil then with soft white brush add some glow.

Step 33
To make the bird head looking catchy we should shape a nice big comb. For the purpose I used the trapezium-shaped balcony base. Select it and firstly apply Edit, Transform, Warp to give it a tear drop shape. Then warp it more to achieve a nice waved comb “feather”. Scale it down using Edit, Free Transform, duplicate the layer three times and using transform function again, arrange the four comb feathers on the bird’s head. Call their layers Comb Feather 1, 2, 3 and 4 respectively. Create a new group named Comb to integrate these layers and place it between Eye and Beak layer.

Step 34
STEP_34
In this step we’ll continue our work on the comb. Duplicate all its four layers- from Comb Feather 1 to Comb Feather 4, merge them, place the merged layer below the original ones and call it Comb Long Feathers. Firstly scale the long feathers by means of Edit, Free Transform then give them a wavy shape using Edit, Transform, Warp.
Take also three feathers from the thin tail feathers scale them down and warp using Transform options and place the layer named Golden Comb Feathers below the previously created Comb Long Feathers layer.
In order to prettify the comb, create a new layer placed below all layers in Comb group and call it Comb Lights. Use a small size Soft brush of nice bluish color (#a9d1d1 for example) to add some shiny dots at the end of each golden comb feather. To make them look shiny, apply:
Blending options: Outer Glow
Blend Mode: Screen;
Opacity: 75%;
Noise: 0%;
Color: # 43ede2;
Technique: Softer;
Spread: 1%;
Size: 26 px;
Contour: Linear;
Anti- aliased- unchecked;
Range: 62 %;
Jitter: 0 %.

Step 35
To give more volume to the bird’s body duplicate the whole Body Feathers Group, right click on the highlighted duplicate and select Merge group. Name this new layer Body Feathers Merged, change its Blend Mode to Linear Dodge and reduce Opacity to 27 %. Take Eraser Tool and select a Soft Round Brush of Opacity 60% to erase the middle and part of the bottom right of these body feathers. Optional: Instead of using Eraser, you can apply layer mask and use soft black brush of 60 % opacity to clear the same parts. On the left part of the screen shot concerning this step you can see which particular parts I have erased.
Duplicate again Body Feathers group and merge the copied one. Rename the new layer Body Feathers Merged 1 and place it above the previously merged layer. Reduce the opacity again to 27% and this time change the Blend Mode to Overlay. With the same soft Eraser with lowered opacity, clean a bigger portion of the feathers.

Step 36
Let’s put some more volume to the bird’s body. For the purpose duplicate the whole Bird Body group, merge its contents (right click on the group, select Merge Group), change the Blend Mode of the new layer to Overlay and change its Opacity to 50-55%. Rename the layer Bird Shadow and leave it placed above Bird group. By means of Soft Brush eraser (60-70% Opacity) remove some portions of the body, beak and tail.
Duplicate again the Bird folder, merge this new duplicate and call it Bird Merged. Change the Blend Mode to Overlay, Opacity to 10% and place the layer above Bird Shadow layer. Use Soft Brush Eraser only to remove the eye area and the tail.
On the left side of the image referring to this step you can see how Bird Shadow and Bird Merged layers look and what parts of them I have erased.
You can use Layer mask instead of Eraser as you can more easily restore the erased parts in case you make mistake while removing portions of the layer.

Step 37
Here we continue with the final touches of the bird body- to add some color shades to it. Duplicate three times the original Bird group, together with the previously created 2 layers. Merge each of the duplicates and name the layers Bird Merged 1, Bird Merged 2 and Bird Merged 3.
At first load a selection on Bird Merged 1 (select the layer, hold down Ctrl and click on the layer’s thumbnail) then fill the selected area with Green, Purple, Blue Gradient (From Pastels gradient set), select Radial type of gradient. Set Blend Mode of the layer to Hue and decrease opacity to 33%. Use Eraser Tool (Soft Round brush, Opacity 60 %) to clean some portions of this gradient layer- the head and the bottom right part plus parts of the tail. Keep the selection loaded on this layer. We’ll need it right now.
Now move to Bird Merged 2 layer and within the selection draw a Radial type, Purple, Green, Gold Gradient. Use Soft Eraser to clean the head. Now you can deselect (Ctrl+D). Change the layer’s Blend Mode to Multiply and Opacity to 9%.
To add more glow to the head and neck go to Bird Merged 3 layer and take again Soft Eraser of reduced opacity to clean parts of the body and the tail. Leave only the head and legs intact. Change the Blend Mode to Lighten and reduce Opacity to 52%.

Step 38
Create a new group called Flower Buds on top of layers palette. Firstly we’ll prepare the stalks. Select a thin golden curve from the ceiling ornaments. By means of Image, Adjustments, Brightness and Contrast, increase the contrast value. Using Edit, Free Transform, make the stalk shape thinner. Name the layer Stalk and place the stalk at bottom left. Duplicate it two times, scale down the duplicates and warp both of them the way they don’t look identical. Move them to the right of the first stalk.

Step 39
Create a subgroup within the Flower Buds group of layers and name it Big Flower Bud. Select the same frosted glass part we used for the head feathers. Scale it down with Free Transform and Warp it to get a flower bud petal shape. Name the layer First Petal. Load a selection on it (Ctrll+click on layer’s thumbnail), create a nee layer above and fill the selection with Rust, Green, Gold Gradient, set the layer’s Blend Mode to Multiply and reduce opacity. Then merge both layers. Duplicate this First Petal and place both duplicates below the original. Name them Second Petal and Third Petal. Darken them a bit with the help of Burn Tool and place them behind the original first petal to shape the flower bud. Move it to fit the first stalk on the left.

Step 40
The flower bud we created in the previous step looks like pinned to its stalk. Let’s improve its look by adding some tiny calyforms. Select one of the small rectangle mirrors mounted to the wall. Darken it using Burn Tool and make its upper sides concave by means of Edit, Transform, Warp. In order to support our .psd file “management”, create a new subgroup called Calyforms and place it on top of all subgroups within Flower Bud Group. If it seems complicated to you, just have a look at my screenshot.
So, place the shape we just created in this Calyforms group and name its layer Calyform 1. Duplicate twice the layer and place both duplicates below the original. Call them Calyform Left and Calyform right, according to the side they’ll be placed. Warp them to fit the first shape and use Free Transform to scale them down and to fit them to the flower bud.

Step 41
In order not to leave the other two stalks without buds, hold down Shift to select both groups- Calyforms and Big Flower Bud right click and choose Duplicate Group. Merge them and name the new layer Flower Bud_Second. Reduce its size using Free Transform, then go to Image, Adjustments, Hue/ Saturation, check Colorize Option and move the Hue ruler to obtain nice purple color. If you don’t like purple, choose whatever color you prefer.
Repeat this step again- hold down Shift to select Calyforms and Big Flower Bud groups and duplicate them. Merge the duplicates and call the new layer Flower Bud_Third. Scale down the bud shape (Edit, Free Transform) and place it on its stalk. I haven’t changed the color, if you like color this flower bud in purple or something else.

Step 42
Create a new group of layers named Big Flower and place it below Branches group. Create a subgroup named Stamens and for making the stamens of the flower select the same wall mirror we already used for making the calyforms in the previous step. On the rectangle mirror apply Edit, Transform, Distort and Edit, Free transform to shape it. Darken the sides with Burn Tool. Name the layer Stamen 1. Duplicate it three more times and name the layers Stamen 2, Stamen 3 and Stamen 4 respectively. You can see on my screenshot that Stamen 1 layer is at the bottom of Stamens subgroup and Stamen 4 layer- on top of it. To give more volume, apply Bevel and Emboss on each Stamen layer – simply right click on any Stamen layer, select Bevel and Emboss and without changing anything, click OK. When ready, copy and paste the layer style on the other Stamen layers.
Highlight all four stamens layers and duplicate them. Merge the duplicated ones, name the new layer Stamens_Linear Burn and as seen by this name, the Blend Mode should be Linear Burn.
Select one of the arched ceiling ornaments and place its layer at the bottom of Big Flower group. Name it Big Flower Stalk and place the layer at the bottom of the main Big Flower group.
Optional: you can apply to this layer Blending Options, Bevel and Emboss:
Style: Inner Bevel;
Technique: Smooth;
Depth: 100%;
Direction: Down;
Size: 26 px;
Soften: 0 px;
Angle: minus 60 degrees;
Use Global Light- checked;
Altitude: 30 degrees;
Gloss Contour- Linear (default);
Anti-aliased- unchecked;
Highlight Mode: Overlay;
Color: # 1c4a0f
Opacity: 58%;
Shadow Mode: Multiply;
Color: Black (# 000000)
Opacity: 24%.
For finally making the big flower, use the same frosted glass trapezium. Warp it to obtain a tear drop shape, load a selection on the shape, create a new layer and fill the selection with Radial type Gold, Teal, Green Gradient (From Color Harmonies 2 gradient set). Set the Blend Mode of this gradient layer to Color and reduce its Opacity to 50%. Merge both layers and duplicate nine times the new layer. Merge these ten tear drop shapes and name the layer Chalice- place it below Stamens subgroup.
The Big flower shape is almost ready but it still looks flat and too bright for the whole darkish mood of the image. You see on my screenshot that there is a layer on top of the main group named Big Flower Group_merged. Change the Blend Mode to Multiply and Opacity to 90%.

Step 43
Now it’s time to add some pearls and relief to the big flower. For the purpose select one of the switched off lamps under the balcony. Resize it by means of Edit, Free Transform and place the pearl like round shape in the middle of the Big Flower. Name its layer Big Pearl. Duplicate the Big Pearl layer and decrease more its size, then place it near to the end of any petal. Repeat the process of duplicating and scaling down till all petals have nice four pearls “incrustation”.
On all Pearls layers (including the Big Pearl in the middle) apply Bevel and Emboss- right mouse click on any of them, choose Blending Options, check Bevel and Emboss and press OK button. Copy and paste the layer style on all the rest Pearls layers.
For these layers create a new subgroup called Pearls and place on top of Big Flower group. The first layer of it is Big Pearl layer and the second layer is Small Pearls (not to overload my .psd file with too much layers, I merged all side pearls on the petals into one layer).
Once Bevel and Emboss layer style is applied, right click on the respective pearl layer, select Copy Layer Style, then holding Shift highlight all other pearls layers, right click and choose Paste Layer Style.
Use the same “pearl” shape of the lamp to give the flower nice relief waves on the petals. To do it is very simple. You only need to turn the lamp “pearl” into a long vertical line using Free Transform. Once you have this long line, go to Filter, Distort, Shear, leave checked the Wrap Around option and create six waves on the diagram. You can see it on the screenshot.
On the Wave layer paste the same Layer Style (Bevel and Emboss) already applied on the Pearls layers.
Duplicate the layer nine more times so that to add wave to each of the petals. Merge all ten wave layers and name the new layer Flower Waves, then place it below Big Flower Group Merged layer.

Step 44
Take a thin golden arch ornament from the ceiling, shape from it a stalk, then duplicate this layer eight times, decrease the size of the duplicates and fix them to the main stalk. Merge all layers and using Burn Tool, darken the parts where the small branches are meeting the stalk. Smudge the top of the stalk- curve it so that not to look like cut. Name the layer Bell Flower Stalk (you’ll see in the next step what I meant when calling it like this) and place it inside a new group, named Bell Flower. Place this new stuff above Flower Buds group.

Step 45
In this step we’ll carry on shaping the Bell Flower. Select one of the lamps under the balcony, duplicate its layers seven times and arrange these bell resembling shapes to the stem created in Step 44. Now we have a nice weed with tiny bell like flowers. Merge their layers and name the new one Bell Flower Pearls. Place it on top in Bell Flower group.

Step 46
Duplicate Bell Flower Pearls layer, rename the second one to Light and change its Blend Mode to Screen and Opacity to 80%. Apply three layer styles:
1. Blending Options, Outer Glow:
Blend Mode: Screen;
Opacity: 75%;
Noise: 2%;
Color: # a7a5ff;
Technique: Softer;
Spread: 0%;
Size: 25px;
Contour: Linear;
Anti-aliased is unchecked;
Range: 71%;
Jitter: 0%.
2. Blending Options: Inner Glow:
Blend Mode: Multiply;
Opacity: 76%;
Noise: 0%;
Color: # 738cf5;
Technique: Softer;
Source: Edge;
Choke: 0%;
Size: 19px;
The other settings in Quality field are by default.
3. Blending Options: Bevel and Emboss:
Style: Inner Bevel;
Technique: Smooth;
Depth: 100%;
Direction: Down;
Size: 2px;
Soften: 0px;
Angle: minus 60 degrees;
Use Global Light is checked;
Altitude: 30 degrees;
Gloss Contour: Linear;
Anti-aliased- unchecked;
Highlight Mode: Linear Dodge;
Color: # 4218dd;
Opacity: 100%;
Shadow Mode: Multiply;
Color: # 000000 (Black);
Opacity: 36%.

Step 47
The next plant we’ll add to our Magic Wood image is a big transparent flower. To shape it firstly select the big golden ornament at the balcony front. Warp it, duplicate the layer, apply Edit, Transform, Flip Horizontal, fit it to the original half and merge both layers. The first petal is ready. To make it transparent load a selection by holding down Ctrl and left click on the layer thumbnail. While the petal is selected go to Select, Modify, Feather, enter 40px in the box, click on OK and after feathering the selection press Delete key. Apply Blending Options, Color Overlay:
Blend Mode: Overlay;
Color: # 19ddba;
Opacity: 100%.
Duplicate this petal layer and change the Color Overlay style of the duplicate. Set the Blend Mode option in Color Overlay box to Soft Light and change the color to # 3f26d6.
On this duplicated layer apply also Blending Options, Bevel and Emboss:
Style: Inner Bevel;
Technique: Smooth;
Depth: 704%;
Direction: Down;
Size: 50px;
Soften: 0px;
Angle: minus 60 degrees;
Use Global Light is checked;
Altitude: 30 degrees;
Gloss Contour: Linear;
Anti-aliased is not checked;
Highlight Mode: Multiply;
Color: # efdb00;
Opacity: 100%;
Shadow Mode: Multiply;
Color: # 081b39;
Opacity: 100%.
Duplicate the last layer, create a new empty layer below it and merge both to apply the layer styles. Use Edit, Free Transform to make the shape narrower.

Step 48
Continue to process the tranparent flower. Duplicate the first petal layer (the one on which we applied Color Overlay) five more times and arrange them to obtain flower shape. Merge these six layers and name them Petals.
Repeat this action with the second petal layer (on which we added Bevel and Emboss). The duplicates must coincide perfectly with the previously arranged petals. Merge these six layers and name the new one Petals Copy.
It’s time to repeat the same with the narrower petal we processed at the end of the previous step. Place each duplicate in the middle of the bigger petals and after merging the duplicates, name the layer Petals Transformed.
I found the flower too pail colored and to correct this, duplicated the three layers: Petals, Petals Copy and Petals Transformed, then merged their copies and named the new layer Flower_Merged Layers.
Place all layers created in this and in previous step in a group called Transparent Flower (put it between Bird Legs and Branches groups).
To complete this transparent flower, create a new layer on top of the group and name it Stamen. Use soft round brush of colors # 4ca088; # 476c82 and # b5cbe9.
Let’s not leave the flower hanging. Give it a stem. Select one of the arch shaped thin ceiling ornaments, duplicate it and using Edit, Free Transform shape it to make a branched stem. Merge these layers and name the new one Stalk. Place it below all layers in Transparent Flower group.

Step 49
In this step we’ll create the last flower to decorate the magic wood. Select one of the small mirrors mounted to the wall and warp it to extend and sharpen one of its edges. By means of Image, Adjustments, Hue/ Saturation (Ctrl+U), change the color of the shape to nice green-blue. Name the layer Petal 1 and place it into a new group named Glowing Flower (between Bird Legs and Transparent Flower groups).
Let’s start to make the flower glowing according to the name of its group. Firstly apply on the shape:
Blending Options: Outer Glow:
Blend Mode: Screen
Opacity: 75%;
Noise: 0%;
Color: # f6f62d;
Technique: Softer;
Spread: 0%;
Size: 49px;
Contour: Linear;
Anti-aliased: unchecked;
Range: 89%;
Jitter: 0%
Secondly, add Bevel and Emboss layer style with the following settings:
Style: Inner Bevel;
Technique: Smooth;
Depth: 52%;
Direction: Down;
Size: 112px;
Soften: 0px;
Angle: minus 60 degrees;
Use Global Light is tiscked;
Altitude: 30 degrees;
Gloss Contour: Linear;
Anti-aliased: unchecked;
Highlight Mode: Pin Light;
Color: # f5d316;
Opacity: 100%;
Shadow Mode: Multiply;
Color: # 000000 (Black)
Opacity: 77%.

Step 50
Time to select again one of the “sacred” lamps located under the balcony. They are precious for their big pearl like shapes. Increase the size of the pearl with Edit, Free Transform and darken it using Image, Adjustments, Brightness and Contrast (Contrast- minus 50; Brightness:100). Place this dark pearl in the middle of the flower and name its layer Seed-Vessel (placed above Merged Petals layer). Optional: you can go to Layer, Layer Style, Bevel and Emboss and change only the Highlight Mode to Overlay and Highlight Color to # b9e4e6.
From the same pearl-like lamp shape create the stamens- I used 10 “pearls” arranged on the Seed- Vessel (all stamens shapes merged in one layer). Right click on Stamens layer, choose Blending Options, tick Bevel and Emboss and click OK.
You can see on the screenshot the Stamens layer placed above Seed-Vessel.
We need only one layer to complete the whole Glowing Flower work. Highlight its group, duplicate it, merge the duplicate, call the new layer Merged Flower Layers or something like this and place the layer on top of all other layers in Glowing Flower group. Change its Blend Mode to Soft Light. No bother about the stem, we’ll add it in the next step.

Step 51
Below Branches group create a new group named Small Flowers. We’ll make it to add more live and deepness to the background.
Firstly arrange the thin flower stems. To make them use the arch shaped golden ornaments on the ceiling. Scale down and warp them, then merge all stem layers in one named Flower Stalks. Amongst those stalks is the one I added to the previously made Glowing Flower.
Now add flowers to some of the stalks. Let the others look like long thin grass. Duplicate Transparent Flower group and merge it. Duplicate the new merged layer five times and name the duplicates Flower 1, Flower 2… to Flower 6. Now play with Blend Modes and Opacity:
Change Blend Mode of Flower 1 and Flower 2 layers to Luminosity. Leave the Blend mode of Flower 3 (bottom left hand corner) as Normal but using Hue/ Saturation (Ctrl+U) change the color shade. As for Flower 4 layer, keep its Blend Mode as Normal, but reduce Opacity to 83%. Go to Flower 5 layer and change Blend Mode to Difference and lower Opacity to 70%.
Move to Flower 6 layer and change its Blend Mode to Hard Light.
To add stamens to these 6 flowers, you can take soft brush and the same colors used to make the stamens of the Transparent Flower. Name the layer Stamens and place on top in Small Flowers group.

Step 52
We’ll continue to enrich our background with mystic looking plants. This step is easy as more of the flowers and branches added are duplicates of the previously created stuff.
At first add a new group placed above Background group and call it Background flowers. Duplicate Flower Buds group which is on top of our .psd file and merge it. Name the layer Flower Buds 1 and place in Background Flowers group then change its Blend Mode to Multiply and reduce Opacity to 42%. Duplicate the layer and name the new one Flower Buds 2. Enlarge them using Free Transform, change Blend Mode to Linear Light and leave Opacity as before- 42%. No more buds for the background. We’ll continue to create more weeds.
Duplicate and merge Bell Flower group. Name the new layer Bell Flower 1 and move it in Background Flowers group above Flower Buds 2. Set the Blend Mode to Multiply and reduce Opacity to 29% then go to Filter, Blur, Gaussian Blur, enter 4px.
Now duplicate Branches group and merge it. I erased the fluffy shining blossoms but if you wish you can leave them. Name the merged layer Branches and move to Background Flowers group above Bell Flower 1 layer. Scale the branches with Free Transform, place them on the upper right hand corner of the image, change Blend Mode to Soft Light and Opacity to 66%.
You can see on my screenshot that there is Branches 2 layer placed above Branches layer in Background Flowers group. To make it you can either use again the stuff from Branches group or shape a new branch. I preferred the second option and selected a part of the thick arched ornament on the wall directly above the whole riot of small square mirrors. As a final step to complete this nice golden branch I Used Free Transform, Warp, Brightness and Contrast.
It is the next layer’s turn. Select another “sacred” part- the same shape we used to make the Big Flower Chalice. Use Free Transform and Warp to turn it into a long thin stalk and place on the left hand side of the image. Leave the Normal Blend Mode but reduce Opacity to 25% and place the layer above Branches 2.
Duplicate Branches layer and make the shape bigger by means of Free Transform. Call the duplicate Branches 3, change Blend Mode to Vivid Light and reduce Opacity to 15%.
Fed up with duplicating those groups of layers? Sorry, we should carry on this process to complete our mystic background.
Duplicate Transparent Flower group and merge it. Call the new layer Transparent flower and place it above Branches 3 layer in Background flowers group. Change its Blend Mode to Color Dodge and reduce Opacity to 40%.
Now we are close to the end of this easy but long and boring step.
Highlight again Bell Flower group and this time duplicate it twice. Merge both duplicates one after the other. Name the first merged layer Ball Flower 2 and the second- Bell Flower 3. Place them on top of Background flowers group. Don’t change their Blend Mode, only reduce Opacity of Bell Flower 3 layer to 50%.

Step 53
On the screenshot given to this step you see how my background looks after the whole processing. As a final touchup add some ghostly branches silhouettes. You can use dark soft brush of 40% Opacity or just duplicate a few times the Left Branch layer and arrange it randomly to create a tangle of branches. Go to Filter, Blur, Gaussian Blur and enter 4.6 px then reduce layer’s opacity to 75%. Place this layer in Background group above Purple Green Gold Gradient layer.

Step 54
We are ready with all plants so it’s time to add more live to the magic wood. Let’s create some insects and why not a snail crawling on a big flower petal.
Create a new group called Insect. While we are shaping the creature the place of its group is of no importance. I put it above Bird group.
Select the flowery golden ornament decorating the base of the balcony. Using Edit, Transform, Warp, give it the shape you see on the screenshot. Go to Layer, Layer Style, Bevel and Emboss and enter these settings:
Style: Inner Bevel;
Technique: Smooth;
Depth: 100%;
Direction: Down;
Size: 63px;
Soften: 0px;
Angle: minus 60 degrees;
Use Global Light- checked;
Altitude: 30%;
Gloss Contour: Sawtooth 1;
Highlight Mode: Overlay;
Color: # f5dc08;
Opacity: 100 %;
Shadow Mode: Overlay;
Color: # 3658b8;
Opacity: 66 %.
To shape the front insect wing, duplicate this layer, go to Edit, Free Transform, nudge to the right using Right Arrow key, scale down only a few pixels and change Angle of Rotation to 3.2 degrees. Press Enter to apply the transformation then hold down Ctrl+Alt+Shift and press T key fifteen times. When ready, merge all 16 layers (15 duplicates plus the original) and your wing shape is ready. Compare your result with my screenshot. You should have a shape resembling my result.

Step 55
In this step we are gong to complete our insect image. Use the same flowery golden ornament decorating the base of the balcony which we used for the upper wing. This time don’t duplicate its layer, only go to Edit, Transform, Warp and make the shape look wider.
Select the lamp at the bottom left of the picture to create the insect’s eyes, shape the body, head, antennae and legs taking parts from the arched ceiling ornaments. Use Burn Tool to darken the legs. To color the wings, firstly load a selection on the upper wing (Ctrl+click on its layer thumbnail) create a new layer above and fill the selection with Purple, Green Gold gradient, Radial type (draw the gradient from the middle to the side part of selection). Change the Blend Mode of this gradient layer to Soft Light and reduce opacity to 84%.
Repeat this action to color the bottom wing. Load a selection on its layer, create a new layer above and draw within the selected area Blue, Yellow, Pink Gradient. Change Blend Mode of the gradient layer to Multiply and reduce Opacity to 50%.

Step 56
To darken the Insect you can duplicate its group, merge it and change the Blend Mode to Multiply. Play with Opacity.
See the screenshot concerning this step- There are three subgroups in the Insect group. On top of the group is Wings subgroup including the four wings shapes and the gradient layers which color the Insect. Below is placed Insect Body subgroup containing antennae, head, eyes and body layers. The last subgroup is Insect Legs which consists of all six legs.
On the screenshot to Step 57 is given the exact place of the insect shape and its group.

Step 57
Select Insect group and place it above Background Plants group. It is not necessary the insect to be so big and in front of the image. The center of the picture is the bird; all other plants and creatures are complementary. While the Insect group is highlighted, go to Edit, Free Transform and reduce the size if the flying creature, then go to Edit, Transform, Distort or Perspective and make the insect to look as coming from above. On my screenshot you see it placed on the right hand corner of the image.
Use the same techniques- transformations, layer styles and gradients to add another insect flying around in the Magic Wood a nice golden butterfly.
Shape its upper wings from the thickest golden ornament above the wall mirrors. For the bottom wings choose the medallion shape on the front column. To give the bottom wing a spiky look, use the strawberry shaped edge of the medallion, add also a “pearl” from the lamp and give it Pillow Emboss. Change the settings of the layer style as you wish to make the pearl look really precious on the butterfly’s wing.
Let us not leave the wings without head and body. I started to shape the body from the vertically furrowed line you see on the wall behind the balcony railing. Duplicated the selected rectangle, flipped vertically the copied part and fitted it to the original, then merged both layers. On the merged butterfly body layer applied Edit, Transform, Warp, Fish, 30%. When Fish type warp was applied, I warped more the edge of the shape to start resembling insect’s body.
For the butterfly’s head I chose the same part from the medallion, used for the bottom wing and applied Image, Adjustments, Brightness and Contrast to darken it.
In order not to leave the butterfly blind, selected the switched on lamp on the left bottom hand side of the image- the same used for the insect’s eyes, and applying transformations put nice shiny eyes on the head. Finally I placed the Butterfly group between Bird Legs and Glowing Flower groups.

Step 58
Some final touches on the butterfly- to add color to its golden wings, draw Medium Spectrum gradient (Radial type) on a new layer above the upper wings and change Blend Mode of that gradient layer to Soft Light.
On a new layer above the bottom wings draw Radial type Spectrum gradient and change the layer’s Blend Mode to Multiply, Opacity 29-30%.
You can implement the upper described action separately on each wing or merge both upper wings then draw the Medium Spectrum gradient. When ready repeat the same on the bottom wings- merge them and draw on a layer above the Spectrum gradient. As you can see from my screenshot I have preferred the first option- worked separately on each wing layer simply because I am always loosing my time doing foolish things and overloading my computer with lots of too big files.
With Soft Black brush (Opacity not higher than 15%), add some shadowing to the edges of the wings.
Despite the legs and antennae of the butterfly will almost not be seen, I duplicated their layers from the Insect group and fitted them to the butterfly then merged their layers with butterfly Body layer.
To make the butterfly occupy its proper place in the picture, highlight its group and reduce the size of the creature with Edit, Free Transform then place it at the bottom right hand part of the image (See the last 60th step).

Step 59
This is the last but one step and our purpose here is to add something crawly to the Big Flower. Using Elliptical Marquee Tool select a round part of the arched golden ornament inset with lustrous round clouded glass. Increase it size with the help of Edit, Free Transform and to give it slight colorful shading apply Blending Options, Bevel and Emboss:
Style: Inner Bevel;
Technique: Smooth;
Depth: 100%;
Direction: Up;
Size: 17px;
Soften: 0 px;
Angle: 30 degrees;
Use Global Light is checked;
Altitude: 30 degrees;
Gloss Contour: Cone- Inverted;
Anti-aliased is not ticked;
Highlight Mode: Soft Light;
Color: # d996da;
Opacity: 100%;
Shadow Mode: Overlay;
Color: # 78f0ec;
Opacity: 31%.
Let us shape the snail’s shell. Duplicate the golden circle inset with “pearl” go to Edit, Free Transform and while holding down Shift nudge Once with Upper Arrow key then nudge Once with Right Arrow key and slightly scale down. Now stop holding down Shift, just rotate at 20.8 degrees and press Enter to apply the transformation. After this hold down CTRL+ ALT+SHIFT and press T key about 80 times to get a nice snail shell.
Shape the body of the snail from the base of the balcony (the same ornament we used for the insects wings) darken it with Burn Tool and warp till you get something resembling slug. The same way create the snail’s tentacles and piece together all parts- body, tentacles and shell to make the crawly thing. Put all layers in one group called Snail and placed above Big Flower group. Highlight Snail group and scale it down with Free Transform to make the snail fit the flower.
Create a new layer below all layers in Snail group and call it Snail Body Shadow. Use Soft Black brush of 30% opacity to paint some shadow.

Step 60
Here comes the last step, short, easy and not as boring as the other 59 steps above.
Select Bird_Sample layer and go to Layer, New Adjustment Layer, select Black and White. Don’t change the settings and when the New Layer Dialog Box appear, just click OK button. Change Blend Mode of this Adjustment layer to Lighten and set Opacity to 70%. Take Soft Black brush of 50% Opacity and brush (the mask of the layer, not the layer’s thumbnail must be selected) the areas of the branches, bottom left and upper right hand side of the image.
On top of your Layers palette create another adjustments layer, this time to slightly change the contrast.
Select the Bell Flower group which should be above all stuff and go to Layer, New Adjustments Layer, Brightness and Contrast- move the slider of Brightness to 59 and set Contrast to 30. Change the Blend Mode to Overlay and reduce Opacity to 19%. While the mask of the layer is selected, erase with soft black brush all the areas around the bird. You see on the screenshot the black spots in the white mask.

Step 61
After all these long steps and all efforts made you should have a really Magic Wood on your screen. Good luck and have fun.


0 comments:
Post a Comment