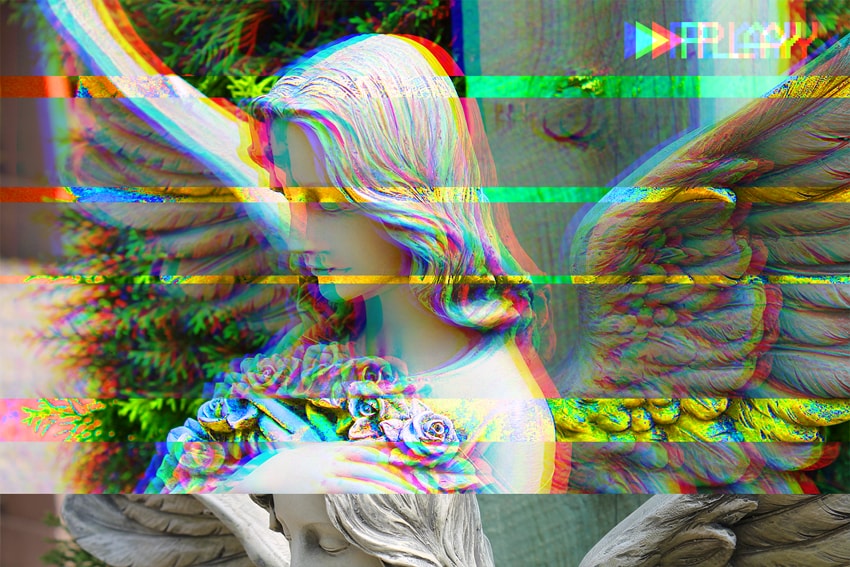
Do you like that grunge, glitched look on old VHS tapes? There are different ways to add such effects to your images and even create an animation from a static photo using an Animated VHS Creation Kit.
This tutorial will show you how to convert your image to a VHS frame in simple steps using only standard Photoshop tools.
Tutorial Assets
- Any photo you want to use for this manipulation. You can find some free photos on Unsplash and Pixabay or buy high-quality photos on PhotoDune. I chose this photo from Pixabay.
- Free font: VCR-OSD-Mono font.
1. Prepare the Document
Step 1
Use Control-N to create a new document and use the following settings: 1500 x 1000 px; 300 dpi.

Step 2
Go to File > Place and put your image inside the document.

Step 3
Resize your image to the borders of the document and click Enter.
-min-min.jpg)
Step 4
Click T and create a new text layer in the top right corner.

Step 5
Click U and select Polygon Tool, and create a triangle shape. Then place it as shown in the image below:
-min.jpg)
Step 6
Select your layers by holding Shift and then Right Click > Merge Layers.

Step 7
Now Right Click on the layer and then Convert to Smart Object.

Step 8
Create four duplicates of your smart object using Right Click > Duplicate.

2. Create the Effects
Step 1
Make all layers except the first two invisible, and then Double Click on the second layer and Uncheck the Green and Blue channels.
%202.jpg)
Step 2
Click V and Move your second layer, holding Shift, 30 px to the right.

Step 3
Make the third layer visible and Uncheck the Red and Green channels the same way as listed above. Then move it, holding Shift, 20 px to the left.

Step 4
Make the fourth layer visible, and go to Layer > New Adjustments Layer > Hue/Saturation.

Step 5
Double Click on the adjustments layer and change the Saturation setting to+100.

As you can see, the saturation effect is applied on the entire image, but we need to crop it to only a few areas.

Step 6
Right Click on the “Hue/Saturation” layer and select Clipping Mask, so this effect will be applied only on the necessary layer.

Step 7
Now Add Mask to the fourth layer.

Step 8
Alt-Left Click to open the mask layer. Fill it with black.

Step 9
Click M and select the areas on the mask where you want to reveal the effect, and Fill it with white.

Now the saturation effect is applied only on a few areas:

Step 10
Add a Mask to the fifth layer and Fill it with black. Then create a big white area a little above the center.

Step 11
Move this layer 600 px down, while holding Shift.

Step 12
Go to Filter > Blur > Motion Blur and use the following settings: Angle: 15°; Distance: 15.

Step 13
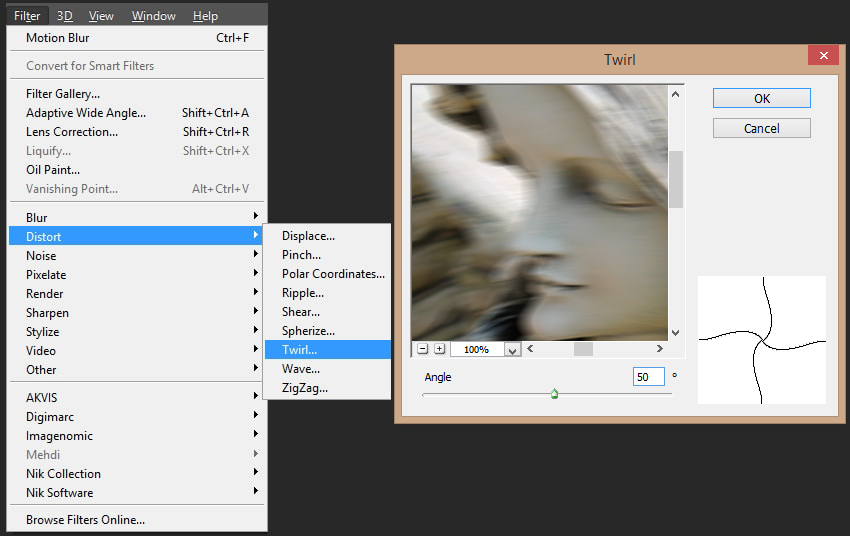
Let's add some more distortion to the image. Go to Filter > Distortion > Twirl and use the following settings: Angle: 50°.

Step 14
Right Click on the Hue/Saturation layer and select Duplicate. Then put it above the fifth layer and Create A Clipping Mask.

This is how our image will look after all the manipulations listed above:

3. Create the VHS Textures
Step 1
Create a new layer using Shift-Control-N, and Fill it with white.

Step 2
Go to Filter > Filter Gallery > Sketch and select Halftone Pattern. Use the following settings: Size: 2; Contrast: 2.

Step 3
Double Сlick on the layer and set the following settings: Blending Mode: Overlay; Opacity: 25%. Uncheck the Red and Blue channels.

Step 4
Duplicate the texture layer and then use Control-T while holding Shift to rotate it 90° and resize to the borders.
.jpg)
Step 5
Double Click on the layer and set the following settings: Blending Mode: Normal; Opacity: 15%. Uncheck the Green and Blue color channels.

Step 6
Click U and select Rectangle Tool. Then create a shape with the following settings: Width: 1800 px; Height: 120.

Step 7
Right Click on the rectangle layer and select Rasterize Layer.

Step 8
Go to Filter > Noise > Add Noise and use the following settings: Amount: 400%; Distribution: Uniform; Monochromatic.

Step 9
Go to Filter > Blur > Motion Blur and use the following settings: Angle: 0°; Distance: 20 px.

Step 10
Go to Image > Adjustments > Brightness/Contrast and use the following settings: Brightness: 150; Contrast: 100.

Step 11
Use Control-I on the rectangle layer to invert the colors of the noise texture, and then change the Blending Mode to Color Dodge.

Step 12
Duplicate your noise stripe layer a few times and move it, holding Shift, to different places.

Step 13
Create a new layer using Shift-Control-N, and Fill it with black.

Step 14
Go to Filter > Noise > Add Noise and use the following settings: Amount: 400%; Distribution: Uniform; Monochromatic.

Step 15
Now add the Patchwork effect using Filter > Filter Gallery > Patchwork and use the following settings: Square Size: 0; Relief: 0.

Step 16
Go to Image > Adjustments, select Threshold, and set it to 240.

Step 17
Double Click on the layer and use the following settings: Blending Mode: Screen; Opacity: 100%. Uncheck the Red and Blue channels.

Step 18
Now you will need to Duplicate the layer, Check the Red and Bluechannels, and Uncheck the Green channel.

Step 19
Move this new layer, holding Shift, 60 px to the right.

Step 20
Create a new layer using Shift-Control-N and Fill it with black. Change the Filloption to 0%.

Step 21
Double Click on the layer and select the Stroke parameter. Use the following settings: Size: 25 px; Position: Inside; Color: Black.

Step 22
Now you need to rasterize the layer style: Right Click > Rasterize Layer Style.

Step 23
Go to Filter > Blur > Gaussian Blur and use the following settings: Radius: 4px.

Step 24
Resize your frame to fill the canvas using Control-T and holding Shift.

4. Color Corrections
Step 1
Now you will need to create color correction layers to make our image look more "VHS". Go to Layer > New Adjustment Layer > Curves.

Step 2
Duplicate your curves layer and put it above the first layer.

Step 3
Double click on the first curves layer icon and use the following settings:

Step 4
Now Double Click on the curves layer and change the Opacity of the curves to35%.

Step 5
Double click on the second curves layer and select the standard Photoshop preset “Strong Contrast”.

Awesome Work, You're Now Done!
In this simple way, we can create VHS-style glitch artworks from any photo using only standard Photoshop tools.

You can also check the animation created with the Animated VHS Creation Kit from the same picture.


0 comments:
Post a Comment