Photography is a skill that I believe most designers should have at least a fundamental understanding of. You never know when you might need to run out and shoot a photo of your own for a project. Personally, I love to shoot photos, and it is nice to have a good catalog of photos in my arsenal, just in case.
On New Year's Eve, I took a series of photos in Central Park for the fireworks. Some of the photos that I took turned out great, others, not so much. In this tutorial, I would like to show you how to take one of the lesser quality photos in your collection and quickly turn it in to something that you can use for a project. The result will be a really cool-looking kaleidoscope effect that can be used in a variety of graphic design projects, and on just about and photo. Let's get started!
Tutorial Assets
You will need the following assets to complete this tutorial. Please download them before you begin.
1. Prepare the Photo
Your first step should be to open up the DNG file that I supplied you with. DNG is Adobe's raw format. Shooting your photos in raw format will give you the most flexibility when applying adjustments to your photos.
Note: This image is a 40 MB DNG file and is 7360 x 4912 pixels. Because of its size, some of you may have difficulty opening this image on your machines. Because of this, I am including an un-cropped version of this image in JPG format so that everyone can follow along. Feel free to use the JPG file. This technique can also be applied to any photo, so feel free to use your own photo and if you would like to skip the Camera Raw steps, open up your JPG image and skip to Section 1.3.
Step 1
Double-click the photo. It should immediately open up in Adobe Camera Raw.

Step 2
Now we will adjust some of the Basic settings in Camera Raw. When you are done, click Open Image.
Tip: In this step, I encourage you to have fun and be creative. Don't feel obligated to copy the settings that I used. Play around with the ACR settings and see what type of effects you can achieve on your own.


Step 3
Now that we have our adjustments applied, and the image opened in Photoshop, it is now time to crop. Select the Crop Tool and crop your image as shown below. Your crop doesn't have to be perfect, just make sure to crop out the stairs and the light. Also, make sure to select the Delete Cropped Pixels option.


Step 4
Before we proceed to the next section, double-click on the locked background layer and name it Top Left to unlock it.


2. Create the Kaleidoscope Effect
Step 1
Now we need to expand the canvas a bit to create the kaleidoscope effect. Do this by going to Image > Canvas Size. Apply the settings, as shown. Make sure to set the Anchor to Top Left and change the units to Percent. Setting the Width and Height to 200%will double the size of your canvas.


Step 2
Now we will need to duplicate and flip our Top Left layer to cover the empty parts of the canvas. Select the Top Left layer and pressCommand/Ctrl-J on your keyboard. This will duplicate the Top Leftlayer. Rename this new layer Top Right.

Now go to Edit > Transform > Flip Horizontal.

Now move the Top Right layer into position, as shown.
Tip: Enable Snapping by going to View > Snap. This will make it much easier to precisely place the new layer so that there are no seams.

Now select both the Top Left and Top Right layers. With both layers selected, press Command/Ctrl-J. This will duplicate both layers. Rename them Bottom Right and Bottom Left.

Select both the Bottom Right and Bottom Left layers and flip them vertically by going to Edit > Transform > Flip Vertical.

Tip: If you see any transparent pixels at the bottom or right side of your canvas. Go to Image > Trim to remove them. You could also just crop them out.

3. Make Final Adjustments
At this point you could consider this tutorial complete. The kaleidoscope effect is now done but I think that this image is a bit warm. The light from the original photo is giving some areas a yellow glow. This since photo was taken during the winter, I think we need to cool it down a bit.
Step 1
Select all your layers and merge them by right-clicking on them in theLayers Palette.

Rename new layer Kaleidoscope.

Step 2
While there are a ton of ways to add color adjustments to images in Photoshop, in this tutorial, I am going to use the new Camera Raw Filter to adjust the Temperature, since the Camera Raw Filter is where we started. Feel free to use an adjustment layer if that is what you prefer.
Right click on the Kaleidoscope layer and select Convert to Smart Object. This will allow us to use the Camera Raw Filter non-destructively.


Step 3
Now select the Kaleidoscope layer and go to Filter > Camera Raw Filter.

Reduce the Temperature to -15.

Your adjustments can now be used as a Smart Filter. So if you don't like the way it looks, you can easily change it.

Conclusion
In graphic design, I think that it is important to use the assets that you have in creative ways. It is always fun to see what you can do with imagery that might not otherwise see the light of day. In this tutorial, we took a fairly useless photo, made some adjustments to it in Adobe Camera Raw, cropped it, and then applied a quick and easy kaleidoscope effect to it with just a few steps. We also showed you how to apply the new Camera Raw Filter in Photoshop in a non-destructive way. The result, is a graphic that can be used in any number of ways including, but not limited to, a background for a photo manipulation, a piece of art, or even a texture. The possibilities are endless. I hope that you enjoyed this tutorial and can use the techniques that I explained to create something amazing on your own!


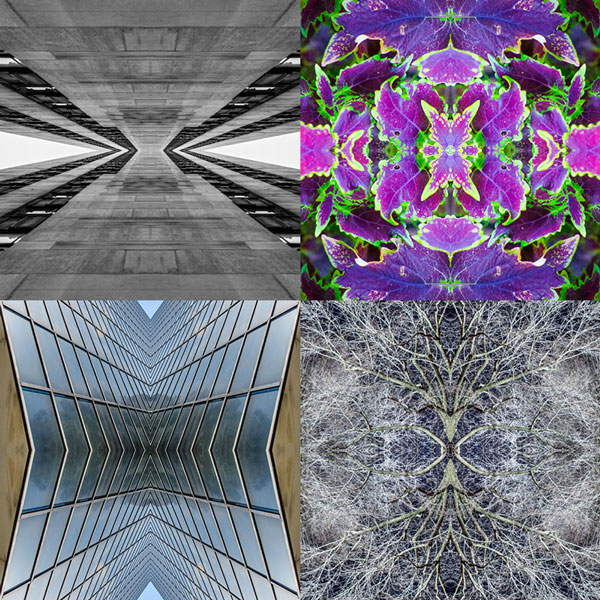
Additional Examples
I thought it would be fun to include some additional examples of this technique applied to other images.


0 comments:
Post a Comment